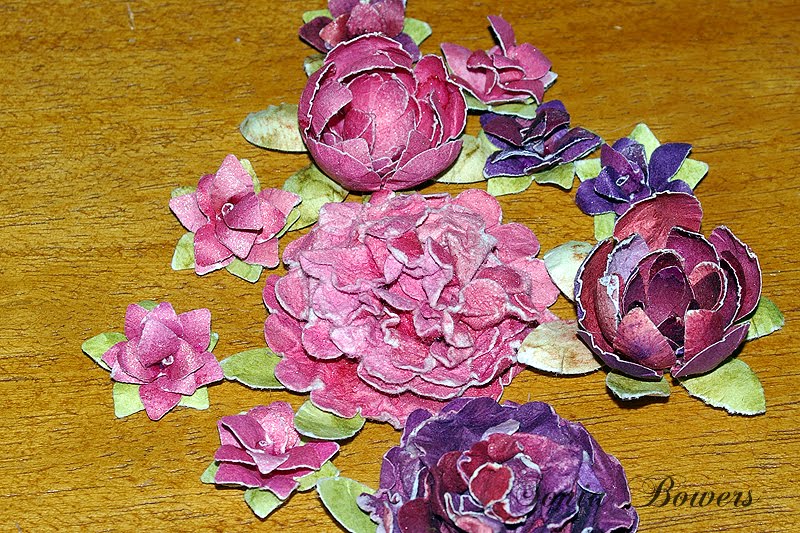
So thanks for all the comments, emails and facebook messages regarding my flowers, I know you all think they look brought!!!
So I decided to show you my version of the how toos....
I think I covered my versions of the swipe and spritz well in this post, :) LMAO so I am not going to show you how I made the papers, but here they are made.

Remember to do both sides of your flower papers though.
The green is coloured using the Tim Holtz wrinkle effect (scrunch, swipe with ink, spritz with water, and iron, yes iron nothing over it straight iron, you will here the water and dye sizzle. I iron on a folded towel that is for craft so it takes the excess ink off the iron after a few swipes too.)
My iron is a cheap $14 from Coles, that I only use on craft.
The two tone pinks/red/purples are made using Tim Holtz wrinkle free effect (using my silicone bake sheet method it works for me)
OK moving on....
We are going to make the easiest one first.
The scrunch rose (pictured centre in pink and bottom front in purple)


 Punch 7 scallops with your scallop circle punch
- Spritz with a little water and scrunch each circle up and I mean a little water, just a light spray it helps aid in the scrunching and the scrunches to stay in the paper when it dries.
- Now unscrunch, being gentle not to tear and stack them up.
- Then using an awl (hole poker) tool, poke a hole in the centre, and insert a brad, you won't see this brad, so it doesn't matter what colour.
- Next up is the scrunch again, so if your flower has dried a bit spritz a little more water.
- You are going to take each layer and scrunch around the brad, till you end up with a scrunched wad.
- Then you need to slowly tease out the layers till you get the effect you like and a pretty scrunched rosette.


- Onto the leaf, punch out a daisy from your green.


- Then using the basicgrey rubon roller, or a stylus, rub down each petal from the tip to the centre as in the tutorial from this post.
- Flip over your daisy opening the petals a little then rub the centre.
- Flip and cut off just two leaves.
- Attach a little wet glue on to the point and slip this into the last layer of your flower...


your done...
Next is
The tiny roses
 ....I have used the principle of the Tim Holtz grunge rose, that is seen in many of these tutorials that I watched at different times and absorbed some of each of the processes, and adapted to use the Carl 5 petal mini punch that I have had for forever.

- You need 3 punches from flower colour and one from the green for your leaves.
- You will need to keep one flower whole, cut two petals from one and one petal from the last.
- I have used the mouse pad and rubon roller technique from above on each of the petals. The single petal you cut out can be discarded, unless when you have completed putting your rose together, you feel the need to fill in a gap than can be tucked and glued in - in all the above pictured I didn't need it.
- Now comes the fiddlier bit, I use a toothpick to add more curl to the tips of the petals and to aid in sticking the layers together as in all the other rose tutorials.

 Take your four petals and make it a 3 by gluing one petal to another. Pinching and shaping as your glue dries, I use Dimensional Magic just the tinyest drop is enough and dries quick enough whilst holding - you do however get rather sticky fingers. :)
- Take your three petal and make it a 2 again gluing one petal to another.
 The two petal becomes a centre by, now this is hard to photograph and demonstrate on your own, but well it's a rolling of one petal into the other around a tooth pick. I hold the two petal so it resembles an L with the toothpick at the far right, roll and glue this to the upright part of the l.
 Then glue your sections together, starting with the now 3 petals into the 5 off setting your petals as you go, the 2 petals inside your 3 and lastly snip off about half the rolled section of the single petal and poke inside as your last petal.


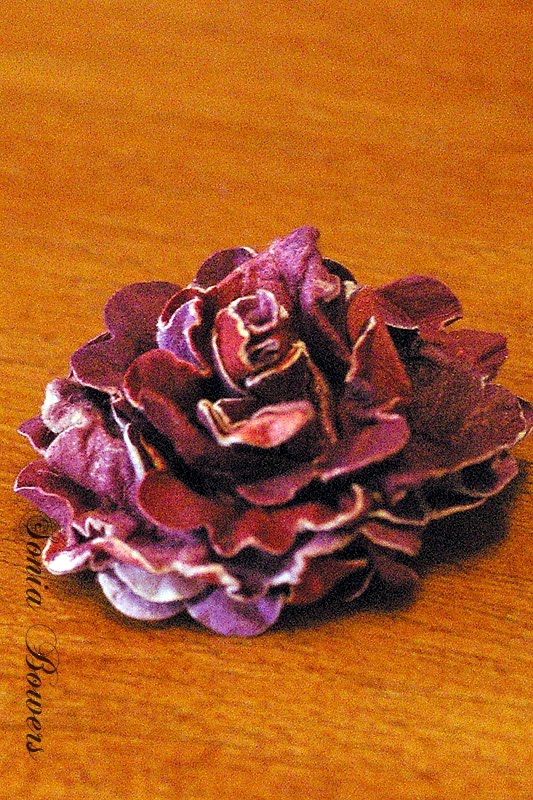
The Cabbage Rose


This is the one I created just using the last of the sheet of dyed paper and an assortment of punches... and working on the principle of the coconut flower tutorial from my previous blogpost on handmade flowers.
You will need
- 2 Regular EK Daisy Punchies
- 1 Regular Retro Punched piece
- 1 Whale of a punch Daisy Punched piece
- 1 Whale of a punch Retro flower piece
- Using the same mouse pad and basicgrey roller technique from above, on each of the flowers.
- Then stack and glue each of the petals one inside each in graduating sizes.
- Use a Large Daisy in the green as leaves on the bottom.

I hope I have helped you understand how I achieved my BROUGHT look handmade flowers, if you use this tutorial, please comment and link back so I can see your creations too....
Gorgeous Sonia! Your flowers are absolutely stunning
ReplyDelete